| First | Previous | Glossary | About |
Under construction!
Programming with wxWindows - 8 - Using a database
- Introduction
- ODBC (Open Database Connectivity)
- The ODBC classes
- The application
- Some makefile changes
- Summary
Introduction
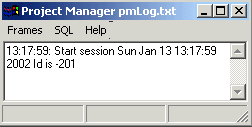
It's now time to put together what we have and try to build something approaching a "real" application. This tutorial is quite a bit more complex than the previous tutorials and to the things we have learned previously we:
- learn some background on ODBC,
- build a simple odbc class,
- build an embryonic application that combines our work so far, the odbc class and the wxGrid class.
Our application won't be especially complex but it will be a useful foundation for some real work.
ODBC (Open Database Connectivity)
The Microsoft corporation is often accused of all kinds of dreadful things, sometimes quite justifiably, however there are instances where Microsoft make contributions to the computing world which are of immense value, the ODBC interface is one of those instances.
ODBC defines an interface for accessing databases both locally and remotely. The objective is to achieve high interoperability (I know there shouldn't be such word as interoperability but it's the one Microsoft use). In principle this means that an application can access any DBMS by changing a component that is external to the application. We could write an accounting system that stores its data in a DBMS and then let the end user decide which DBMS they will use. We might develop and test the application using Postgresql but it might be deployed with an Oracle database. Unfortunately it isn't quite that straightforward in practice but it gets close, especially if the application developer sticks with the standard SQL (Structured Query Language).
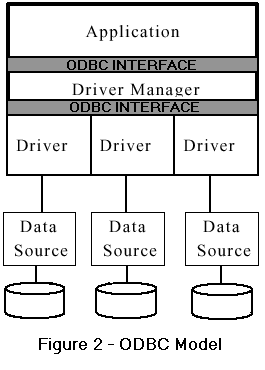
ODBC actually provides two interfaces, shown here in figure 2. Once is between the application which you write and the ODBC driver manager. The driver manager is a piece of software that links the application, via a second interface, to a driver. The driver is another piece of software which actually communicates with the DBMS and there are ODBC drivers available for just about every known database from old Dbase formats to the giants like Oracle and Sybase and, fortunately for us, PostgreSQL and MySQL.
Initially we need to concern ourselves with a few issues:
- Obtaining the appropriate driver or drivers.
- Ensuring we have a driver manager. This isn't a problem on Windows boxen since an ODBC driver manager is part of the kit. It can be a minor vexation on Linuxen since you have to install a driver manager. I use UnixODBC.
- Configuring the driver to point to a dbms which means
- you need a dbms somewhere. I use both PostgreSQL and MySQL running on Win2K and on Linux.
I use MyODBC for MySQL on both Linux and Win2k and psqlODBC for PostgreSQL on both Linux and Windows. Well I think so, it is that long since I last looked. After all how often do you bother to check software that works well?
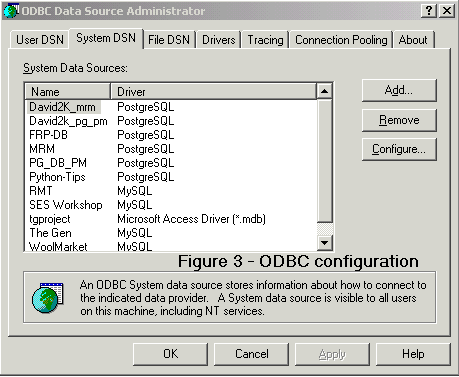
Here is a brief wrap-up on configuring an ODBC connection in Windows. Obtain and install the drivers that you need then, assuming you have a dbms to connect to, run the ODBC sources configurator. You can get there via Settings-Control Panel-Administrative tools. You should see something like Figure 3.
The tabs of main concern are the DSN tags - User and System. A DSN is a Data Source Name, ie a shorthand reference to a dbms connection. A User DSN is just available to a given user, a System DSN is available system-wide.
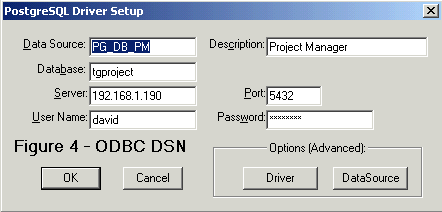
Figure 4 shows the DSN for a PostgreSQL database. The data source is PG_DB_PM, the database is tgproject, the server is 192.168.1.190 and the port to the dbms is 5432, the standard PostgreSQL port.
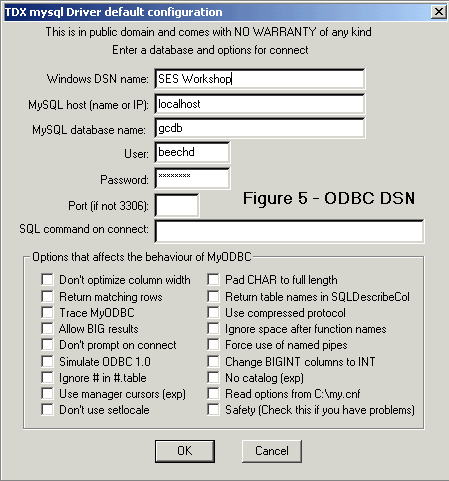
Figure 5 shows the DSN for a MySQL database. The data source is SES Workshop, the database is gcdb, the server is localhost and the port to the dbms is 3306, the standard MySQL port.
You can see that the dialogs are quite different visually but carry essentially the same information, evidence of different authorship, which is what you would expect since this service of configuring is provided by the driver.
The dsn information is stored in ini files and, in the case of Windows, probably in the registry.
Linux has the same approach to configuration especially if you use the UnixODBC driver manager. I've found it easier though just to edit the odbc.ini file, the major problem is making sure that you are using the correct one since, as with all things Linux, there are a number of options. The odbc.ini file can be in a users home directory or in the installation directory for UnixODBC or in /etc.
I'm going to leave you to your own devices when it comes to installing and configuring the ODBC components but there is plenty of help out there.
The ODBC classes
About the API
I'll review the API briefly, at least enough to get us started writing our application but if you really want to read about ODBC in all its detail the you can get the actual specification from Microsoft or better go to SolidTech and download the specification as a collection of PDF's. Browse down the page for the Microsoft ODBC Specification.
The ODBC API provides three key elements which we use:
- An environment handle: this is a global structure and is used to manage things of a global ODBC nature. It's required but not used much unless we are working with drivers and driver managers.
- A connection or database handle: most of the work is done with this element, it is the link with a specific database.
- A statement handle: this points to an SQL statement which is executed within the context of a connection handle.
I have written a simple ODBC wrapper which consists of two classes:
- An ODBC connection class: TQConnect, and
- An ODBC Table class: Table
The interface for the connection class can be seen here, and the implementation here. The interface for the table class can be seen here and the implementation here.
I've commented the code to help explain it but you will need to refer to the ODBC API documentation in order to understand what the API calls do.
The rest of this tutorial is dedicated to using the simple ODBC classes in an example application.
The Application
Apart from the features we've used in earlier tutorials the application now provides for:
- Connecting to an ODBC database
- Sending an SQL statement to the database, and
- Viewing the results of the SQL statement in a grid component
Connecting to the database
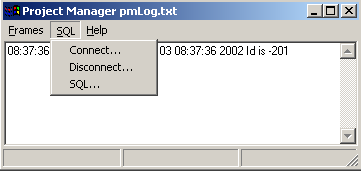
Figure 6 shows how we select the ODBC connection dialog, a choice from a menu in pmMainFrame. You can view the code for pmMainFrame here. The interface can be viewed here. It will be useful to keep these open while we look at how the application connects to the database.
The connect event fires the OnDBStart method shown below:
void pmMainframe::OnDBStart(wxCommandEvent & event)
{	SQLRETURN rc;
	pmSRCdlg * getLogon =
	new pmSRCdlg (this,-1,"Log on (dsn,uid,pwd)", wxPoint(100,100), wxSize(450, 300),
  					wxRESIZE_BORDER |  wxDEFAULT_DIALOG_STYLE);
	if (getLogon->ShowModal() == wxID_OK)
	{	wxString connectStr = getLogon->GetValue();
		wxLogMessage("Connecting to %s", connectStr.c_str());
		rc = dbConnect(connectStr);
		if (rc == SQL_SUCCESS)
			wxLogMessage("Connect OK");
		else
			wxLogMessage("Connect failed. SQL return code %d", rc);
	}
	else
   		wxLogMessage("Connect declined");
}
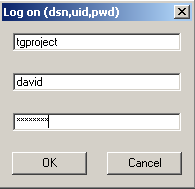
We enter a DSN, user name and password and select the OK button. You can see in OnDBStart that we use some ODBC API features. We have a variable called rc of type SQLRETURN and we use a constant called SQL_SUCCESS. We call a function dbConnect with the connect string argument which we get from connection dialog.
Don't forget that you will need a valid DSN in order to connect successfully. The connect dialog here shows a connection to a DSN called tgproject. This happens to be a Postgresql database located on a server which happens to be a yard or so away from me. It could be on the other side of the world.
The class pmMainFrame contains two database-related members, theDatabase which is a type TQConnect and theTable which is a type Table. The TQConnect class has a connect method:
SQLRETURN TQConnect::connect(const char * szDSN)
{
  rc = SQLAllocConnect(henv, &hdbc);
  if (rc == SQL_SUCCESS)
   {  rc = SQLDriverConnect( hdbc, 0, (SQLCHAR *) szDSN,
                             SQL_NTS,
                             (SQLCHAR *) buf,
                             sizeof(buf),
                             &buflen,
                             SQL_DRIVER_COMPLETE
                           );
      cConnections++;
      return rc;
   }
  else
   return rc;
};
and this takes care of connecting to the database via the ODBC API. Remember what I said earlier: you should read the API documentation to gain an understanding of the ODBC API. I could explain the API in more detail but that would take a few tutorials in itself.
If we manage to connect successfully we should get back an SQL_SUCCESS status which we test for in OnDBStart. We're now ready to execute some SQL on our database.
Querying the database
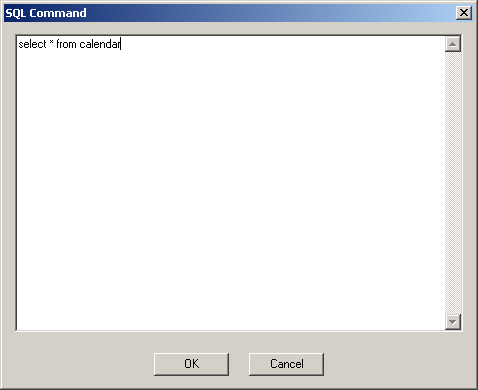
If we select SQL from the main frame SQL menu (Figure 6) we see a simple dialog as shown here.
Just enter a valid SQL statement, or an invalid one if you like, and click the OK button.
Selecting the OK button results in a call to the execSQL method of our connection theDatabase. This method has two arguments: the SQL statement and a reference to a Table object, theTable. The result of the SQL statement are locked up in a vector called tData inside theTable but we don't need to be concerned with that since can get the results via theTable's methods.
You can see in the OnExecSQLGrid below that we use theTable in a couple of ways. We call its getAttribs method to see how many rows and columns it has and we hand it over to an instance of a class called pmGridframe. It is this that takes care of actually displaying the SQL statement result.
SQLRETURN pmMainframe::OnExecSQLGrid(wxCommandEvent & event)
{ SQLRETURN retCode = SQL_SUCCESS;
  wxString cmd;

  if ( GetConnectStatus() )
   {    pmSQLdlg * getSQL =
                new pmSQLdlg (this,-1,"SQL Command",lastCmd, wxPoint(100,100), wxSize(450, 300),
                                                wxRESIZE_BORDER |  wxDEFAULT_DIALOG_STYLE);
                if (getSQL->ShowModal() == wxID_OK)
                {       cmd = getSQL->GetValue();
                        lastCmd = cmd;
                        retCode = theDatabase.execSQL(cmd.c_str(), theTable);
                if (retCode == SQL_SUCCESS)
                {       attribs = theTable.getAttribs();
                        wxLogMessage("%d rows, %d columns", attribs.cRows, attribs.cColumns);
                        if (attribs.cRows > 0)
                        {       pmGridframe * x = new pmGridframe(this, "testing", theTable, 20,20,200,200);
                                x->Show(TRUE);
                        }
                        else
                                wxLogMessage("SQL returned zero rows");
                        }
                }
                else wxLogMessage("Failed - SQL return code %d", retCode);
   }
  else
   wxLogMessage("Cannot execute SQL - we are disconnected.");
  return retCode;
}
Viewing the SQL statement result
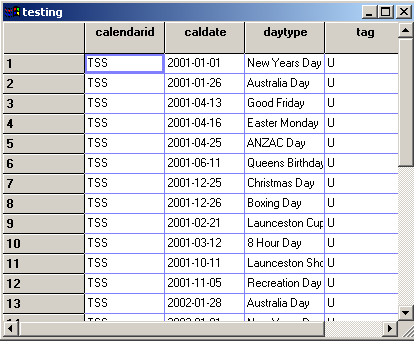
Here you see the data returned by the SQL statement displayed in a wxGrid instance which is contained in a wxFrame instance.
The implementation of pmGridFrame can be seen here and the interface here.
If you look at the code you will see that there is surprisingly little there. It's a testimony to how useful the wxWindows framework is. We created a complex interface to an SQL result set with a few simple calls.
The grid rows and columns can be resized and the cells are editable, though I should hasten to add that we haven't implemented that in this application. Perhaps in the next tutorial.
Some Makefile changes
The Makefile we have been using has been revised and can be seen here.
Summary
A little reminder: In presenting these I have show only the salient details. You should remember that the examples also contain other code that is relevant, for example the window identifiers and the event table. I have left the bulk of the example programs out of the presentation in order to save space and minimize distraction.
If you'd like to download the code and html pages click here.
| First | Previous | Glossary | About |
Copyright © 1999 - 2002 David Beech