| First | Next | Previous | Last | Glossary | About |
Programming with wxWindows - Using custom dialogs with sizers
Introduction to sizers - a brief explanation
I mentioned in the previous tutorial that "hard-coding" was a difficult way to build dialog boxes. There is another problem with approach: it makes the programming a dialog box for resizing operations especially difficult and users do like to be able to resize things.
If you take the example from the previous session (step 5) and make a slight change to the call to the dialog box in the OnAbout event you will see what happens when the dialog is resized; after you have made the executable of course. Add the style wxRESIZE_BORDER as shown below.
void BasicFrame::OnAbout(wxCommandEvent & event)
{
  BasicDialog
   aboutDialog ( this,
                 -1,
                 "Your very own dialog",
                 wxPoint(100,100),
                 wxSize(200,200),
                 wxRESIZE_BORDER
               );
The dialog is now resizable but all you get on a resize is acres of empty space. The controls just stay where they were originally placed. You can, of course, capture the resize event and recalculate the size and position of the controls: but there is an easier way, we use a sizer. This is a control which contains other controls and will automatically resize the controls it contains when the parent of the sizer is resized. The example I use here is straight from wxWindows.
Modifying step 5 - a custom dialog with sizers

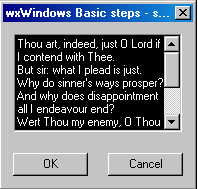
The image shows our custom dialogbox in its basic state. What we want to be able to do is to resize the dialog and have the controls maintain their relative positions and have the textcontrol resize itself to the dialog box.
We can use two kinds of sizer in this example:
- a wxBoxSizer or,
- a wxStaticBoxSizer
The staticbox sizer can contain some static text, the boxsizer is just a box.
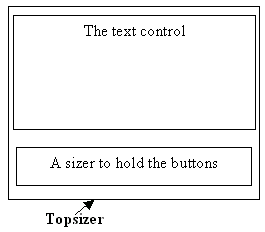
It's useful to model the dialog and its sizers and I've shown that below.

We have a hierarchy of sizers. As the authors of wxWindows say: The basic idea behind a box sizer is that windows will most often be laid out in rather simple basic geometry, typically in a row or a column or several hierachies of either. If you have come from a Delphi or Visual Basic background and are used to just dropping controls on a form you might find that, initially, using sizers is a bit inconvenient. Trust me, and the authors of wxWindows, using sizers is a better way.
We can use any number of sizers to achieve the presentation we want and at the same time we can painlessly implement resizing. We can also add other features of the wxWindows framework to make for even better on-screen presentation by using layout contraint objects and splitter objects. We see those later.
class BasicDialog: public wxDialog
{
public:
    BasicDialog( wxWindow *parent,
                 wxWindowID id,
                 const wxString &title,
                 const wxPoint& pos = wxDefaultPosition,
                 const wxSize& size = wxDefaultSize,
                 long style = wxDEFAULT_DIALOG_STYLE );

    virtual bool Validate();
    wxTextCtrl * dialogText;

private:
    void OnOk( wxCommandEvent &event );
private:
    DECLARE_EVENT_TABLE()
};
|
The header file basic.h contains the dialog interface. It is almost unchanged from the previous example.
Indeed there is nothing here that indicates that the dialog will use sizers. All of the work is done in the constructor.
BasicDialog::BasicDialog( wxWindow *parent,
                          wxWindowID id,
                          const wxString &title,
                          const wxPoint &position,
                          const wxSize& size,
                          long style
                        )
    : wxDialog( parent, id, title, position, size, style )
|
The implementation file contains the BasicDialog constructor. I have left most of the implementation code out but you can download it if you wish (see below). We start the BasicDialog definition.
{
  wxString theTextData = "";
  wxBoxSizer *topsizer = new wxBoxSizer( wxVERTICAL );

  theTextData.append
  ("Thou art, indeed, just O Lord if I contend with Thee.\n"
   "But sir: what I plead is just.\n"
   "Why do sinner's ways prosper?\n"
   "And why does disappointment all I endeavour end?\n"
   "Wert Thou my enemy, O Thou my friend,\n"
   "How wouldst Thou defeat and thwart me.\n\n"
  );
|
We create some variables: theTextData holds the contents of the wxTextCtrl and we just append some data - a part of a Gerard Manley-Hopkins poem.
We also have declared a pointer to a wxBoxSizer called topsizer and its constructor has an argument wxVERTICAL. This means that anything added to this container will be added in the vertical orientation. This is how we planned it above. We will add other sizers to topsizer and these will hold our visible controls.
  // create text ctrl with minimal size 150 x 100
  dialogText = new wxTextCtrl( this, -1,
                               theTextData,
                               wxDefaultPosition,
                               wxSize(150, 100),
                               wxTE_MULTILINE
                             );

  dialogText->SetBackgroundColour(wxColour(0,0,0));
  dialogText->SetForegroundColour(wxColour(255,255,255));
|
We create the text control and add our data.
  topsizer->Add( dialogText,
                 1,
                 wxEXPAND | wxALL,
                 10
               );
|
Then we add the text control to the topsizer.
The Add() method is inherited from wxSizer and has a number of signatures:
- void Add(wxWindow* window, int option = 0, int flag = 0, int border = 0, wxObject* userData = NULL)
- void Add(wxSizer* sizer, int option = 0, int flag = 0, int border = 0, wxObject* userData = NULL)
- void Add(int width, int height, int option = 0, int flag = 0, int border = 0, wxObject* userData = NULL)
It all looks quite daunting but we can take it very simply. Since we are adding a visible control and not another sizer then the first method is the one we use. All its arguments except the first have defaults provided and with the exception of the userData argument are largely self-explanatory. The wxWindow pointer is the pointer to the control we are adding. The second argument, 1, indicates that the size of the control can change in the orientation of the sizer, that is, the text control will change its vertical size as the top sizer is resized. If we had used a horizontal sizer then this would indicate that the contained control would follow the sizer horizontally. The third argument wxEXPAND | wxALL is a combination of alignment flags and border flags and define how the sizer will resize (wxEXPAND) in the remaining dimension, in this case, the horizontal dimension and, whether the control will have a border around it or not. wxAll indicates that there will be a border all round the control. We can summarise this argument, and see the other possible values:
- wxGROW or wxEXPAND - A child may get resized to completely fill out the new size.
- wxSHAPED - A child may get proportionally resized.
- wxALIGN_CENTER or wxALIGN_CENTRE - A child may be centred.
- wxALIGN_LEFT, wxALIGN_RIGHT, wxALIGN_TOP, wxALIGN_BOTTOM - A valid combination will align the child control accordingly.
- wxALIGN_CENTER_VERTICAL or wxALIGN_CENTRE_VERTICAL, wxALIGN_CENTER_HORIZONTAL or wxALIGN_CENTRE_HORIZONTAL - A valid combination will align the child control accordingly.
- wxTOP, wxBOTTOM, wxLEFT, wxRIGHT or wxALL - A border will be applied accordingly.
- userData - Allows an extra object to be attached to the sizer item, for use in derived classes when sizing information is more complex than the option and flag will allow for.
Once we have the basic model working we can come back and try out some of these combinations.
  wxBoxSizer *button_sizer = new wxBoxSizer( wxHORIZONTAL );
  button_sizer->Add
   ( new wxButton( this, wxID_OK, "OK" ),
     0,
     wxALL,
     10 );

  button_sizer->Add(
     new wxButton( this, wxID_CANCEL, "Cancel" ),
     0,
     wxALL,
     10 );
|
We now create another sizer to hold the buttons. Since the buttons have a horizontal aspect this sizer is a horizontal sizer. In each case we fix the size of the button, that is, since argument 2 is 0 then the buttons retain their default sizes and, we set a border all round at size 10. Since we have no alignment then this defaults to 0 (zero) which is implicitly top alignment.
  topsizer->Add(
     button_sizer,
     0,
     wxALIGN_CENTER );

  SetAutoLayout( TRUE );
  SetSizer( topsizer );

  topsizer->Fit( this );
  topsizer->SetSizeHints( this );
}
|
There are just a few more steps. We now add the button sizer to the topsizer and we use the second of the Add() methods since this a sizer we are adding and not a window, ie a visible control. The button is made not stretchable, has no border and will be centred horizontally in the topsizer. The SetAutoLayout() function is a wxWindow method that directs wxWindows to automatically take care of the layout of our dialog when it is resized. The SetSizer() function is another wxWindow method which basically tells our dialog that it is now the owner of the sizer. It can be a bit alarming for beginners seeing methods suddenly appearing like this but we could just as well have written this->SetAutoLayout(TRUE). This would make it clearer that SetAutoLayout() is a method of our dialog, it was inherited from the wxWindow class via the wxDialog class.
The Fit() method directs the dialog to size itself around the topsizer. The curiously named method SetSizeHints() directs the sizer to set the minimal size of the window to match the sizer's minimal size. It has nothing to with hints.
bool BasicDialog::Validate()
{
    return TRUE;
}

void BasicDialog::OnOk(wxCommandEvent &event)
{
  event.Skip();
}
|
If you would like to see an example which uses this dialog and the functions then download wxbasic6.zip and read the source code.
Summary
A little reminder: In presenting these I have show only the salient details. You should remember that the examples also contain other code that is relevant, for example the window identifiers and the event table. I have left the bulk of the example programs out of the presentation in order to save space and minimize distraction.
| First | Next | Previous | Last | Glossary | About |
Copyright © 1999 - 2001 David Beech